Home Blog Page 7

CHEST PRESS WITH DUMBBELLS

0

In this new article we again emphasize chest training, but with a variant to the bar press, it is the chest press with dumbbells, let’s see how it is done correctly.

CHEST PRESS WITH DUMBBELLS

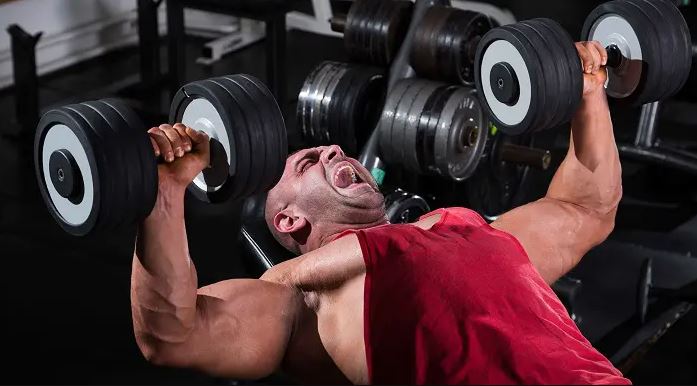
Today we present the press with dumbbells; A similar exercise in terms of execution but when working with dumbbells allows us to perform a greater amplitude in the movement, which favors the stretching of the pectoralis major and intervenes other supporting muscles.

Although, this chest exercise allows us to focus a little more effort on the outside of the pectorals; Triceps and shoulders are less in demand.

The good and interesting thing is that it also allows us to perform the inclined press as a variant, being able to focus the work in other areas.

HOW TO MAKE THE PRESS WITH DUMBBELLS ON FLAT BENCH?

  1. We lie upwards on a flat bench and with our feet on the floor to ensure stability.
  2. We take the dumbbells in pronation with the arms extended vertically.
  3. We inhale, lower our arms to chest level by flexing our elbows and exhaling at the end of the movement.
  4. We bring the dumbbells back to the starting position.

HOW TO MAKE THE PRESS WITH DUMBBELLS ON AN INCLINED BENCH?

The idea of this variant is to work on the inclined bench, which should not be more than 60° to avoid shifting the work to the shoulders.

This exercise focuses the effort on the clavicular bundles of the pectoral, that is, the upper chest and the pectoral muscles that make up that portion.

As in the rest of chest exercises, it also requests the anterior deltoids (shoulders) and triceps, but less intensely than if we were exercising with the barbell.

The rest of the movement is the same as explained above, the only difference as we said before, is that we will perform the exercise on the flat bank, to graph it correctly we upload another image so that they see the correct execution and there are no doubts about it.

SOME TIPS FOR APPLYING THE DUMBBELL PRESS EXERCISE

Since it’s a bit harder to balance dumbbells (especially if one arm is weaker than the other), they may have to take a slightly lighter total load than doing the barbell exercise.

If they use very light loads, the breathing pattern hardly counts. On the other hand, with heavy weights or when the muscles are already tired, correct breathing becomes very important.

By blocking breathing after an inspiration stabilizes the torso, this is a strong support against which the muscles can contract. When going down, the body relaxes and the stiffness of the chest is lost: therefore, we have to expire when the chest does not contract to the maximum.

The bench press with weights can also be done with a neutral grip, i.e., with the palms facing the chest. In this case, it only requests the upper chest and anterior deltoid, and stress is also increased on the triceps.

Can I do sit-ups during pregnancy?

0

Are you pregnant and want to stay active? Are you thinking about starting or continuing with your abdominal routine because you think it can be beneficial for your pregnancy? Today I will tell you if you can do sit-ups during pregnancy, what exercises are recommended and much more.

Can I do sit-ups during pregnancy

When you are pregnant your abdomen begins to undergo some important changes.

This can make you ask yourself some questions about what workouts you can perform for your abdomen and not only for aesthetic reasons, obviously, but rather functional.

Read on to discover and learn more about the basic exercises you can do during pregnancy, and which ones you can’t.

But first of all, let’s answer the most important question…

IS IT SAFE TO DO SIT-UPS DURING PREGNANCY?

The short answer is… It depends, but in general it doesn’t.

The truth is that you should not perform certain activities or exercises without having the OK of your obstetrician, because he is the one who knows your health situation and is the one who can really recommend you if you can train or not.

Now, if the doctor gives you the go-ahead to perform some other exercise, there is no problem; But beware, you will not be able to do any exercise.

At least as far as classic exercises are concerned, such as those we use to mark the abdomen; in case you are pregnant you should never do exercises like the Crunch in all its variants or the leg lift.

This is because when you perform this type of abdominal, the abdominal wall suffers too much outward pressure. And it can lead to aggravation of what is known as “Diastasis rectus abdominis”.

BEWARE OF DIASTASIS RECTUS ABDOMINIS

During pregnancy, the growing uterus stretches the muscles of the abdomen. This can cause the two large parallel bands of abdominal muscles that join in the middle of the abdomen (the rectus muscles) to separate by an abnormal distance, this is the condition called diastasis rectus abdominis. And that can be noticed both when the abdominal muscles are tense, and when you go from lying down to sitting.

Diastasis rectus abdominis can weaken the abdominal muscles, causing low back pain and making it difficult to lift or perform other routine daily activities.

And you may be more likely to develop this condition as a result of pregnancy if you’ve had: multiple pregnancies, a large baby, and you’re short, unfit, or 35 or older.

And not to mention that doing the classic exercises of crunch and leg elevation can aggravate the picture.

WHAT YOU CAN DO IS STRENGTHEN THE BODY CORE

There are certain abdominal exercises focused on strengthening the body core, which you can do with the approval of your doctor.

Let’s go what they are and if you have any questions show them to your doctor to evaluate which one, he recommends.

SITTING KNEE LIFT

I recommend using a chair, sitting on the edge of your couch and applying the next step by step.

  1. Sit near the edge of a chair.
  2. Keep your feet flat on the floor directly below your knees.
  3. Keep your palms down under your hips.
  4. Slowly contract your abdomen by bending your left knee so that you tilt your pelvis and activate your pelvic floor.
  5. Then, slowly bring your left knee toward your chest as you exhale.
  6. Inhale and lower your left foot to the floor, back to your starting position.
  7. Repeat with your right leg.
  8. You can do 2-3 sets of 8 to 12 repetitions. In the first trimester you can also add some light weights (up to 3 kilos) on each ankle.

SIDE ABS

  1. Lie on the floor or on a mat.
  2. Slowly rotate your body to the left side and bend your knees at a 30-degree angle to your hips.
  3. Turn your body to the right side so that your knees rise approximately 15 cm from the floor.
  4. Make sure your body weight rests on the back of your left shoulder and shoulder blade.
  5. Place both hands behind your head with your fingertips touching (but don’t pull on your neck).
  6. Bend your torso up in a diagonal position as if you were trying to touch your right knee. Raise as high as you can.
  7. While performing the steps above, your left shoulder will rise a little off the ground.
  8. Bring your arms to your knees and bend them a little more.
  9. Then place your hands behind your head and lower yourself to the original position.
  10. Repeat this on the other side.
  11. You can perform 2 sets of 10-12 repetitions on each side.

SIDE PLATE

The side plate can be made in several ways. Here are some options you can apply during pregnancy.

  1. Starting on the side, place your elbow directly under your shoulder.
  2. Bend your knees and rest them on top of each other, one straight and the other bent or both straight if this is more comfortable for you.
  3. Keep your back flat and neutral and focus on your breathing.
  4. Contract your hips and lift your torso so that it is in a straight line from head to hips while keeping your head and neck straight.
  5. Hold the position for 20 to 30 seconds and remember to breathe throughout the exercise.
  6. Repeat with the other side.

STANDING BIKE

This is an excellent exercise to help improve your balance and strengthen your core.

  1. Stand up, shoulder-width feet apart, and hands behind your head, inhale.
  2. Then exhale and bring your left elbow to your right knee while doing sit-ups.
  3. Return to the original standing position and repeat with your left foot and right elbow.
  4. Aim for 10 to 20 repetitions

DOG/BIRD ABS

  1. Start at the table position (wrists directly below the shoulders and knees below the hips, with the back straight).
  2. Contract the core, inhale slowly, lift your left leg and extend it in a straight line behind you while also raising your right arm straight in front of you.
  3. Exhale, and bring your left knee so that it meets your right elbow in the middle area.
  4. Inhale, return, and repeat for 10 to 12 repetitions
  5. Then repeat the same steps with the opposite hand and leg.

WHEN WILL I BE ABLE TO RESUME THE CLASSIC EXERCISES?

Immediately after delivery, your body will undergo a gradual restoration process, so after you’ve had your baby, it’s best to avoid doing crunches until they’ve completely healed. And I’m sorry to tell you that this healing process can take anywhere from six weeks to six months to finish, or even longer.

Therefore, you will have to wait a while before you start training your abs again.

Now, taking into account that each woman is different, you can ask your obstetrician or gynecologist to check your abdominal area to see how they are healing, and in what conditions you are.

Keep in mind that your return to the world of body training does not have to happen immediately.

In addition, you can maintain yourself with exercises such as planks, which focus on the stability of the complete core and obliques to help you recover some strength if the doctor gives you the ok.

FINAL WORDS ON ABS TRAINING IN PREGNANCY

Pregnancy is a natural biological process during which your body undergoes many changes. These changes, such as stretching and softening your muscles, are normal and help you have a healthy baby and pregnancy.

During the postpartum period, it is normal and healthy for these changes to be gradually reversed. There’s no need to rush, and your focus should be on your baby and feeling. The most important part of staying fit during and after pregnancy should always be long-term health.

  • If you want to see more about the subject and know if you can do any other type of training during pregnancy, I leave you a link that can be useful: Can you exercise during pregnancy?
  • Here I share as a link where we talk about the benefits of Pilates during pregnancy.
  • And if that were not enough, I also invite you to know what are the best stretches to do during pregnancy.

CALISTENIA – Pros and Cons of Training with Your Own Weight

0

Training with one’s own body weight is a very useful technique, not only because it is simple to carry out but also because it is as effective as any other method, this technique is called: CALISTENIA. Let’s see what it is.

CALISTENIA – Pros and Cons of Training with Your Own Weight

Calisthenics, like any other training method, will have its pros and cons, it will not be for anyone and it will have certain particularities in terms of the objectives you want to achieve.

However, this will depend on certain factors, very relative, and as we have already seen for TRAINING WITH ELASTICS and TRAINING WITH WEIGHTS, let’s try to analyze these points.

ADVANTAGES OF CALISTHENICS

CAN BE PRACTICED ANYWHERE

Training with body weight allows you to train everywhere. What provides a net benefit for sports coaches who can ignore expensive equipment and large facilities, at home is extremely economical.

ALLOWS YOU TO GAIN STRENGTH QUICKLY

Without taking into account the concept of maximum strength, some calisthenics exercises allow the development of great strength. And if you manage to establish a correct progression routine, it is possible to acquire this strength very quickly.

Even doing Calisthenics can be ideal if you want to gain strength before training directly in the gym and focus on muscle hypertrophy routines in order to stimulate greater muscle development.

NO NEED FOR A LARGE UPFRONT INVESTMENT

A big advantage of calisthenics training is that you need very little to no equipment to train.

Not having the need to use specific equipment means you don’t have to buy anything expensive to start training.

Of course, as you progress, perhaps some equipment may be needed (for example, a bar, or rings), but the investment is still very small compared to weight training, in which the equipment is expensive or the monthly subscription adds up.

DOING CALISTHENICS ALLOWS YOU TO DEVELOP DIFFERENT QUALITIES

As you progress with the different calisthenics exercises you will be challenged in multiple ways and not only in regards to maximum strength.

As a result of this, you will develop strength, balance, mobility, flexibility, etc.

Exercising with our body weight also offers a wide variety of movements and exercises to perform, being a great ally for athletes of different disciplines.

CALISTHENICS IS GREAT FOR FAT LOSS

Calisthenics is one of the best training tools for fat loss.

I say this because calisthenics can be easily implemented in HIIT training, circuits, etc.

These methods are some of the bests for weight loss and all of them include some body weight exercises in your routines.

DISADVANTAGES OF CALISTHENICS

IT CAN BE VERY DIFFICULT AT FIRST

Training with body weight can be very difficult, so it ends up discouraging many beginners, something that is aggravated when you are overweight or do not have a basic athletic structure.

IT’S HARD TO ISOLATE CERTAIN MUSCLE GROUPS

When you train to gain strength or endurance, isolating muscle groups may not be of interest to you.

However, if you want to focus on those weak muscles that slow down your progress, one of the best options is to practice with isolation exercises. But isolating muscle groups or weak points is very difficult to achieve when training with bodyweight exercises alone.

In this sense, weightlifting is superior to calisthenics, since it allows to isolate quite easily the areas that require more attention.

HAS LIMITATIONS IN LEG TRAINING

This is the biggest disadvantage of bodyweight training.

While calisthenics, and thanks to different Squats exercises, can help build muscle and build strength, as well as strong and resistant joints in the lower body.

If you intend to develop huge legs, it will not be the best discipline to achieve it, since the volume of training does not only help.

Think that you need to exercise with a lot of weight to develop large legs, and in this sense, there is nothing better than weight training to achieve it.

PROGRESSIONS ARE NOT INTUITIVE

Most people who give up calisthenics training is because they can’t figure out how to progress to more difficult movements.

Unlike weightlifting where they simply put more weight on the barbell, in bodyweight training they will have to gradually move towards more advanced progressions.

Sometimes, figuring out these progressions for yourself can be a very difficult thing.

Moreover, these progressions can be measured only in terms of difficulty and not in terms of actual acquired strength.

IT’S HARD TO BUILD A LOT OF MUSCLE MASS

Yes, you will gain body mass by training with your own BODY, but while bodyweight exercises are very effective for the development of a muscular body, it is very difficult, if not impossible, to get the competitive bodybuilder body when training with calisthenics, even if we use some kind of ballast.

CONCLUSION ON CALISTHENICS

There is no doubt that calisthenics training is a very effective and efficient way to gain more strength, lose fat and build muscle.

However, no method is perfect and the same rule applies to calisthenics.

Although, while it has its weak points, these are very few and of little impact compared to all the advantages it offers.

I would say that it is essential that all beginners perform this type of training work at the beginning of their sports life, then depending on their objectives it will be time to vary the disciplines, or not.

BUTTOCK KICKS ON THE GROUND

0

We return to the guide of exercises for legs but this time we are going to present a routine specially formulated to tone and harden the buttock area with gluteal kicks on the floor.

BUTTOCK KICKS ON THE GROUND

I present the gluteal kicks on the floor, an ideal exercise for women that even for the simple and comfortable to perform is suitable to do it at home since it does not require facilities or dedicated equipment.

Now, if what they are looking for is more load work, they can place on the ankles the typical resistances that are fixed with Velcro to give greater weight to the training and obtain results much faster and more visible in the short time, that if, before they must have gone through the training without weights if they do not train for a long time.

HOW TO PERFORM BUTTOCK KICKS?

  1. We kneel on the floor, with one resting and the other bent over our chests; supported with elbows or hands as they are most comfortable.
  2. Now we have the leg flexed back until a complete hip extension is performed.
  3. To finish we return the leg to the starting point and re-execute the movement for a new repetition.

An interesting variant to apply with this exercise, is the possibility of using different resistances, I said before using ankle bracelets with weight, but you can also use a fixed weight to make the lift, as the following image:

TIPS TO CORRECTLY PERFORM BUTTOCK KICKS

To train in a greater amplitude, try performing the exercise on a flat bench, making the leg to be moved outside of it.

Being an isolation exercise, gluteal kicks have certain limitations. Keep in mind that this exercise is aimed only at the buttocks and does not train the body in an integral way as it happens with the deadlift or even squats.

Remember that compound exercises that involve movement in more than one joint and that request more muscles simultaneously should comprise most of your exercise routine.

Based on this, start the leg training session with compound movements – such as squats, lunges and deadlifts – and end your workout with a handful of isolation movements, including kicks.

Performing the exercise with the leg extended, the hamstrings and gluteus maximus are mainly requested; Doing it with the semi-flexed leg only focuses the work on the gluteus maximus and less intensely so it is more appropriate for those who start training from scratch.

For greater intensity, as we said before, ankle weights can be used and even leaving the leg in extension for two seconds we focus the effort even more.

BUTTERFLY TO TRAIN PECTORALS

0

The PecDeck or butterfly to train pectorals (also known as machine opening) can usually be a very useful complementary exercise if you are looking to achieve a more defined pectoral. Let’s see how it’s done!

BUTTERFLY TO TRAIN PECTORALS

It allows you to train your chest muscles through a wide range of motion while keeping your body well supported.

The pec-deck type of opening has a similar effect to openings with dumbbells on flat bench. The most noticeable difference is that in this you will use a machine, very common in most gyms known as Contractor.

HOW TO PERFORM THE PEC-DECK OPENING FOR CHEST?

  1. Sit on the opening machine, with your back straight and firmly resting on the backrest.
  2. Place your feet on the floor and your elbows and forearms on the pads. Your elbows should flex at an angle of around 90º. The elbows should fall just below the shoulders (the upper arms should not be higher than parallel to the floor) and the limit of the stretch should barely pass the chest.
  3. Once in position, contract your pectorals to bring the pads together in front of your chest.
  4. Flex your chest hard at the time of the exercise where your elbows are together, then return to the starting position by slowly lowering the weight and maintaining strict control of the movement.

MUSCLES USED IN THIS BUTTERFLY EXERCISE

The main muscles involved in the pec deck are the pectoralis major and the anterior deltoid, but the coracobrachial, subscapularis and biceps (the short portion) will also be involved.

EXTRA TIPS FOR MACHINE OPENINGS

The head, shoulders and back should always be firmly supported against the back of the seat. This will allow you to focus only on performing the opening movement.

To know if you are doing the exercise correctly you should always feel that you pull more with your forearms than with your hands. The hands should not be involved beyond the act of taking the pads.

For safety reasons, as you lift more weight, the opening you must make with your arms is less.

OPINION ABOUT BUTTERFLY EXERCISE TO TRAIN PECTORALS

Machine openings provide optimal isolation to the pectoral muscles without intervening the triceps. It allows a good level of congestion with a medium to high number of repetitions. And it is usually recommended to beginners due to its simplicity.

Now, this exercise alone will not develop the muscle mass in the pectorals that you can build with free weights. However, and as I told you at the beginning, this gym equipment can be extremely useful to favor the definition and shape of your chest.

BODYBUILDING EXERCISES VS FITNESS EXERCISES

0

Have you joined the gym; your trainer is going to put together a routine but you still do not know what type of body you are looking for? Don’t know whether to focus on fitness or bodybuilding? Let’s analyze then Bodybuilding exercises vs fitness exercises

BODYBUILDING EXERCISES VS FITNESS EXERCISES

Well, as we have already seen the differences in cardiovascular training between athletes and fitness practitioner’s vs athletes dedicated to the world of bodybuilding.

Today I will continue to mark differences between these two disciplines but this time focusing on the type of training, which although they have much in common, depending on the discipline you do you will see that there is a great difference in base.

EXERCISES IN BODYBUILDING

Broadly speaking (and without taking into account other factors) the world of bodybuilding is based on two types of exercises in an attempt to “develop your weaknesses”, bodybuilders will incorporate compound exercises and isolation exercises into their routines.

Exercises such as DUMBBELL OPENINGSTHE CONCENTRATED BICEPS CURL or LEG EXTENSIONS, are a basic part of the exercise repertoire of a bodybuilder.

While they are excellent for developing these muscles, many of these exercises do little to stimulate the metabolism and promote an integral change in our body.

Also, since these isolation exercises work only on a small area at a time, you must do many different exercises to get a full workout of that muscle, which in turn leads to a greater time commitment.

Here you can learn more about compound and isolation exercises: COMPOUND AND ISOLATION EXERCISES

EXERCISES IN FITNESS

This group of athletes, on the other hand, are more focused on the harmonious appearance of the body and its bodily function. Disciplines such as functional training or CrossFit point in this direction.

And since the body wasn’t designed to engage every muscle and/or movement pattern in isolation, they rarely perform isolation exercises like bodybuilders do.

Instead, they focus on exercises or movements that involve several muscle areas at the same time, just like what would happen during a sporting event for example.

These exercises have a huge metabolic cost and speed up metabolism much more than in bodybuilding.

AND WHAT KIND OF TRAINING ARE YOU GOING TO DO?

As you see THE APPROACH of each discipline is totally different, however this should not be taken as two opposite realities, it is not that it is black or white, there are grays and, in those grays, you enter and the type of body you want to have in terms of structure and muscle capacity.

There are times when an isolation exercise can be used effectively to complement the training of a certain sport greatly improving the results and performance in that sport.

In other cases, a comprehensive workout helps improve flexibility and highlight muscle tone from isolated workouts.

In short? It is up to you to see where you will shift the balance when planning a workout, talk to your coach and always make a long-term planning and thinking about the objectives you want to achieve.

BICICEPS CURL WITH PRONATION GRIP

0

Today we will see how to perform the Biceps Curl with grip in Pronation to maximize the development of the forearms. And, obviously, along with their corresponding training tips.

BICICEPS CURL WITH PRONATION GRIP

We continue to introduce you to new arm exercises, this time, we will show you how to correctly execute the bicep curl with pronation grip (that is, with the palms of the hands down).

This is an interesting exercise since it not only works the biceps but to a greater extent the muscles of the forearm and wrist, which is why we should not work with very high weights if they just start training in the gym; This at least to avoid injuries that can lead to the typical and annoying tendinitis.

Like the rest of the Curl type exercises that we perform standing with bars we can use both the classic bar, and the EZ bar that for some will be much more comfortable due to the type of grip.

HOW TO PERFORM THE CURL WITH GRIP IN PRONATION?

  1. The exercise is performed standing, either with the classic bar or the EZ bar, and with a grip in pronation. The legs should be somewhat apart and the arms extended.
  2. We inspire and raise the bar by flexing the forearms.
  3. At the end of the movement, we must exhale and descend the forearm in a controlled manner.
  4. The Biceps Curl with pronation grip allows you to train several muscles of the wrist and forearm, extending the work to the biceps and the long supinator.
  5. Turning exercise into an ideal complement to the specific training of boxers or tennis players.

6.  TIPS TO CORRECTLY PERFORM THE CURL WITH PRONATION GRIP

  • We leave you some tips to apply when performing this exercise so as not to lose the proper technique and maximize muscle development.
  • The trunk must remain straight throughout the movement. Do not push your hips forward to move the load, especially if you are lifting a lot of weight.
  • The biceps cannot function effectively here, so it does not play a determining role in this exercise, for this reason we must use less weight than in most other biceps exercises.
  • For proper movement, the flexion of the forearm should be limited, the elbow should remain immobile near the side of the body. Do not increase the load if proper technique is broken.
  • The muscles of the forearm play a key role in stabilizing the elbow and wrist. As this exercise develops well in these muscles (especially over the wrist extensors), the hands will be permanently held in forearm alignment. Never bend your wrists.

BICICEPS CURL AT SCOTT BENCH

0

Today I explain to you, step by step, how to perform the bicep curl at Scott Bank, the perfect gym equipment for your arm development routine.

BICICEPS CURL AT SCOTT BENCH

The Scott Bench Biceps Curl is an arm exercise that we should not stop doing in any training routine.

The Scott bench is a gym equipment that will allow us to correctly focus the work on the biceps without falling into the common mistakes of the curl with standing bar and thus avoid the typical pitfalls of that exercise and future injuries.

It can be trained both with a straight bar and with the EZ bar or even with a hand with a dumbbell, which gives it some versatility.

Of course, if we do not execute the exercise correctly, they will not be pure kindness. We must be aware of the movement we are making to avoid injuries due to poor execution which could even cause tendinitis.

Due to the inclination of the bench the tension on the muscle will be very important during the complete extension of the forearms.

For this reason, we must warm up the muscles well before performing the exercise and start working with moderate loads avoiding reaching the maximum extension of the forearm.

HOW TO PERFORM THE BICEPS CURL IN SCOTT BENCH?

  1. 1We sat and rested our arms on the Scott bench.
  2. 2We inspire and perform the extension of the forearms.
  3. 3At the end, we hold a moment up, exhale and proceed to lower the bar in a controlled way (simple? read the tips below).

TIPS FOR TRAINING YOUR ARMS WITH THE CURL ON THE SCOTT BENCH

The arms should remain pressed against the Scott bench from the beginning to the end of the movement. If the elbows are left out, the movement becomes easier thus reducing the effectiveness of the exercise.

– ANGLES: there are usually two support positions. When the inclined position is used, the range of motion is somewhat reduced. This makes exercise less difficult.

– THE EZ BAR should be held with the hands in supination, separated slightly less than the width of the shoulder. But shoulders, elbows and wrists should be on the same plane. Make sure the position is comfortable with respect to arm length.

Hands more apart, increase the participation of the short portion of the biceps. On the contrary, the closer they are attached to the hands, the more the long portion of the biceps will be requested.

You can also do this strength training exercise with a straight bar. In this case, the palms face upwards, resulting in a stronger contraction of the biceps.

During flexion, do not let your elbows rise: this reduces the strain on the biceps, including the short portion.

Keep your feet in a stable position with shoulder width apart. Without performing any “wiggle” to try to lift the load.

Bend your arms until your biceps are fully contracted, which doesn’t mean you’ll have to raise the bar up to your chin.

BICEPS CURL INCLINED WITH DUMBBELLS

0

The biceps inclined curl with dumbbells is an unpopular exercise in most gyms, as it is not usually used with too much weight. But this does not mean that it is not effective, let’s see how it is done correctly.

BICEPS CURL INCLINED WITH DUMBBELLS

How many people there are in the gym who use huge loads to appear incredibly strong, but in terms of technique they leave much to be desired.

They may not know that a low exercise load combined with good muscle insulation helps achieve better results than fighting huge dumbbells or weights, using a poor technique.

Moreover, because of this trend, they leave aside many very effective exercises, such as the one we are analyzing at this time.

If you do it correctly, biceps curl inclined with dumbbells, will help you train both arms simultaneously or alternately with great results.

Let’s see how this arm exercise is performed, which muscles it targets and some training tips to get the most out of it.

HOW TO PERFORM THE BICEPS CURL INCLINED WITH DUMBBELLS?

  1. Start by holding a dumbbell in each hand and sit on an inclined bench (place the backrest at an angle greater than 40 degrees). Keep your head and upper body in full contact with the bench.
  2. Lower your arms to the sides and that they are hanging completely extended and perpendicular to the floor.
  3. Perform the contraction with the palm’s inwards, progressively turning the palm upwards, keeping the elbows still while performing the curl.
  4. Try to achieve maximum biceps concentration at the end of the concentric phase, when the dumbbell almost touches the shoulder.
  5. Raise the dumbbell as high as you can but without moving your upper arm or changing posture.
  6. Lower the dumbbell very slowly to the starting position, stopping just before the elbow fully extends. Repeat with the other arm.

VARIANT OF THE EXERCISE WITH GRIP IN SUPINATION

It is not necessary to start the exercise with the palms facing inwards and then, in the course of the movement, turn the hand so that the palm faces up at the end of it.

You can also start and end the biceps curl tilted with your palms forward.

REQUESTED MUSCLES

This arm exercise focuses primarily on the long head of the biceps (i.e., the part that produces the “beak” of the biceps).

Now, if you use a hammer-like grip (with the palms facing each other), both the long and short heads contribute significantly to the movement.

TIPS FOR PERFORMING INCLINED BICEPS CURL WITH DUMBBELLS

DO NOT USE AN EXCESSIVE LOAD: One of the strengths of this exercise is that it forces the biceps to reduce weight in order to isolate the muscle. If the load is too heavy, there is a risk of losing the technique and “cheating”.

AVOID MAKING SUDDEN MOVEMENTS DURING EXERCISE: The arms are extended above the ground and the elbow is in a vulnerable position.

And in this sense, rapid movements can negatively load some tendon in the elbow, and even more so if you use too much weight. This usually happens when the muscles of the biceps are underdeveloped.

DON’T LIFT YOUR BACK FROM THE BENCH: The inclined bench should be about 45 degrees off the ground, or just a little more, and you should always be leaning on it. The purpose of this is to isolate the arms and prevent the back from arching, which can lead to discomfort in this area.

DO NOT LIFT YOUR FEET OFF THE GROUND: The feet must be firmly planted in the ground to offer stability to the body. Lifting the feet not only makes the exercise less effective but makes the trainee unstable, which can lead to a fall or a loss of proper technique as the learner tries to regain balance.

BICEP CURL WITH SUPPORT

0

Today we present a new exercise for the section Exercises for arms, the classic and well-known Biceps Curl with support on the thigh, let’s see how it is done plus some tips.

BICEP CURL WITH SUPPORT

Because of how simple and economical it is to be able to do it, it is one of the most common exercises carried out at home by those people who are just beginning to train, obviously this is because we only need a dumbbell with an amount of weight according to each user.

But for this reason, being so massive and known, people who just start training, either due to ignorance or anxiety of results, end up performing the exercise badly and not obtaining the expected benefits.

That is why today, we will see how to correctly perform this exercise for biceps, taking into account the position of the body and elbow, two fundamental aspects when it comes to its execution.

HOW TO PERFORM THE CONCENTRATED BICEPS CURL?

  1. This will be done sitting on a bench not very high so that it allows us a correct grip and support of the dumbbell.
  2. We take the dumbbell with grip in supination (that is, with the palm up), and rest the arm on the inner side of the thigh at the elbow.
  3. Now we inspire, we flexion the arm by raising the dumbbell until it is about 45° with respect to the arm, and we exhale at the end of the movement to descend then slowly. This movement then corresponds to a single repetition.

TIPS FOR PERFORMING THE BICEPS CURL WITH THIGH SUPPORT

Let’s see some tips to improve the technique and obtain greater benefits.

The Curl with support on the thigh, or also known as concentrated Curl, is very effective as an exercise with which we must isolate the biceps, keeping the arm in the correct position and safely, pressing the back portion against the thigh.

It is possible, in turn, to have a more limited or wider posture to put greater emphasis on the outside or inside of the biceps.

Inhale (about 70% of your maximum lung capacity) and hold your breath as you lift the load. This will help stabilize your torso to maintain a good position when making the move and using heavier loads.

To place greater emphasis on the three muscles (biceps, anterior brachial, and long supinator), use a neutral grip with your palms facing your body.

To vary and achieve greater effort on the biceps, start with a neutral grip and switch to supination (turning the palm up) as you ascend. Then make the opposite movement by lowering the load to return to the starting position.

The Curl with support on the thigh is a great exercise to increase the volume of the biceps. This isolation exercise helps control movement in amplitude, speed, and straightness.